Hi, we are looking to use timeplan dates to manage a dialogue that changes weekly. We provide a 24/7 services the main hours being 9-5 and the out of hours will transfer to a mobile. We manually change this number every week but are looking at automating this process. So far, we have our main timeplan and then out with these times we would point this to a separate timeplan which will have different timeplan dates for each individual with their own transfer. The out of hours changes at 5pm on a Monday, so the previous person is on midnight to 9am on the same Monday. We can get this working no problem Tuesday - Sunday but as the Monday is split we are struggling to come up with an idea that won’t result in a manual update. The hope is that we can add the dates the person is on in bulk in timeplan dates and system will do the rest. Can you provide any suggestions?
Hi @wardr1 I’ll drop you an email and perhaps we can arrange a call to discuss. There are a number of ways to do this, but I’d like to see what the best way would be to suit.
Hi there, @wardr1
Thanks again for the chat the other day — it was really helpful to get a clearer understanding of your needs and use case.
As we discussed, there are two ways to manage the on-call number. The first is a manual approach, where the person on call logs in and updates the phone number themselves. The second is an automated option, which I mentioned I’d need to test before confirming.
Good news — I’ve tested it, and I’ve got a solution for you!
Prerequisites
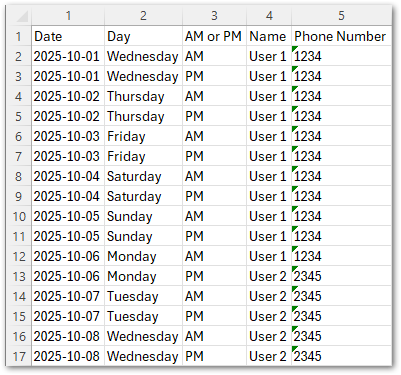
To get started, you’ll need a CSV file with all columns formatted as text to ensure the data is stored correctly.
You can add as many dates as you need — and update or expand the file at any time. Your file should include the following columns:
-
Date – in the format
YYYY-MM-DD -
Day – to easily identify weekdays like Monday without needing to cross-reference dates
-
AM or PM – to indicate who is on call during each part of the day (especially useful for Monday changeovers)
-
Name – the name of the person on call
-
Number – the phone number to be used for that person
You can name the file whatever you like (I’ve called mine oncallrota) and place it on the system server at:
D:\synchronisation\p3\DialogueData
Important: My system uses P3 as the location, but yours might be different. Please double-check your configuration — while P3 is the default, it can vary.
Working with Excel and CSV files
Excel can be tricky when working with CSV files, as it often reformats columns to “General” by default, which can disrupt your data. You have two options to avoid this:
Option 1: Use a Different Tool
Tools like Notepad or Notepad++ are now quite reliable for editing CSV files without altering the format.
Option 2: Open the File in Excel with Text Columns
To ensure Excel treats each column as text, follow these steps:
-
Rename your file from
oncallrota.csvtooncallrota.txt. -
Open Excel.
-
Go to File > Open, and change the file type to All Files (*.*).
-
Locate and select your file (
oncallrota.txt). -
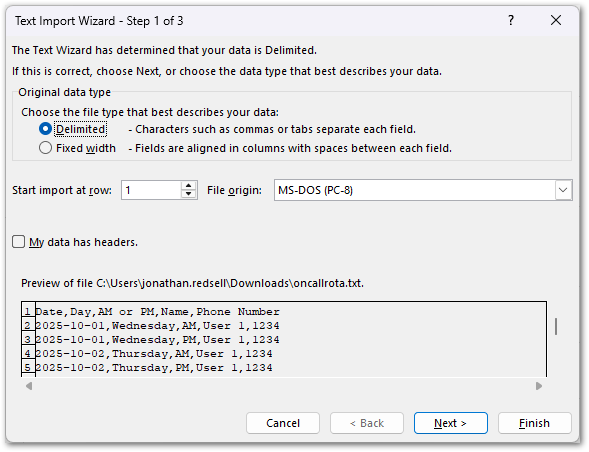
When prompted, choose Delimited as the file type.
-
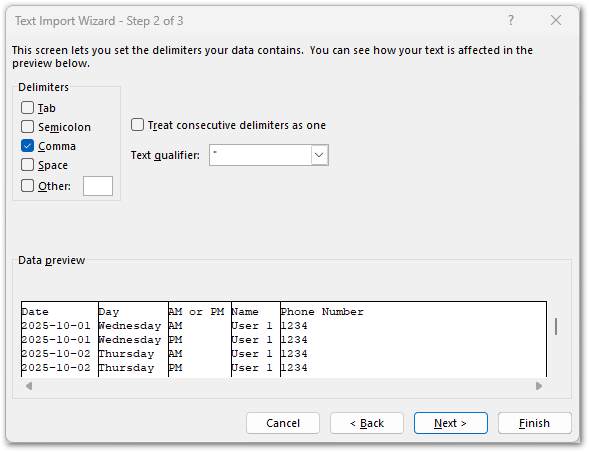
Select “Comma” as the delimiter when prompted. This ensures Excel correctly separates the data into columns based on the commas in your file.
-
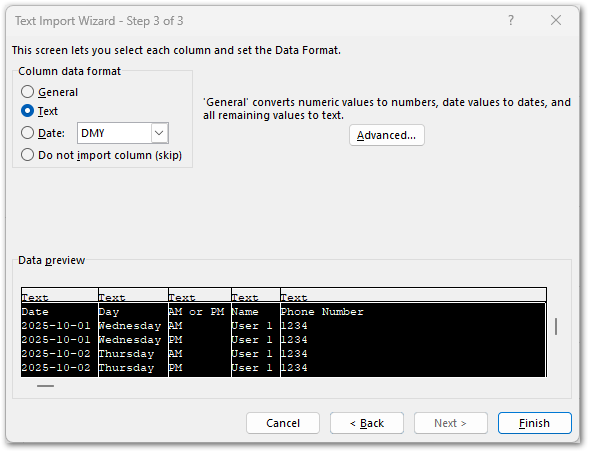
In the Data Preview window, click to select all column headers.
-
Under Column Data Format, choose Text. This ensures each column is treated as plain text, preserving your formatting exactly as needed.
-
Click Finish. Your data will now open in Excel with the correct formatting.
-
Make any necessary changes to the file.
-
When you’re done, be sure to save the file as a
.CSV, not a.TXT, so it can be used by the system. -
Finally, copy the updated CSV file back to your system server location.
The Solution
Adding a Data Source
Now that your oncallrota.csv file is in place, the next step is to add it as a data source in Liberty Converse. Here’s how:
-
Log in to your Liberty Converse Web Admin.
-
Navigate to Dialogues from the main header.
-
Click on Data in the blue navigation bar.
-
Click Add to create a new data source.
-
Name the source the same as your CSV file — in this example,
oncallrota. -
Click Save.
This links your CSV file to the platform, making the data available for use in your dialogue logic.
Once your CSV file is added, you’ll need to make a few adjustments:
-
Skip the first line of the file — this is your header row.
-
Set the number of keys to 1, as we’ll be using the Date column as the primary key.
-
Make sure the filename matches your actual file name (e.g.,
oncallrota.csv). -
Click Save to apply the changes.
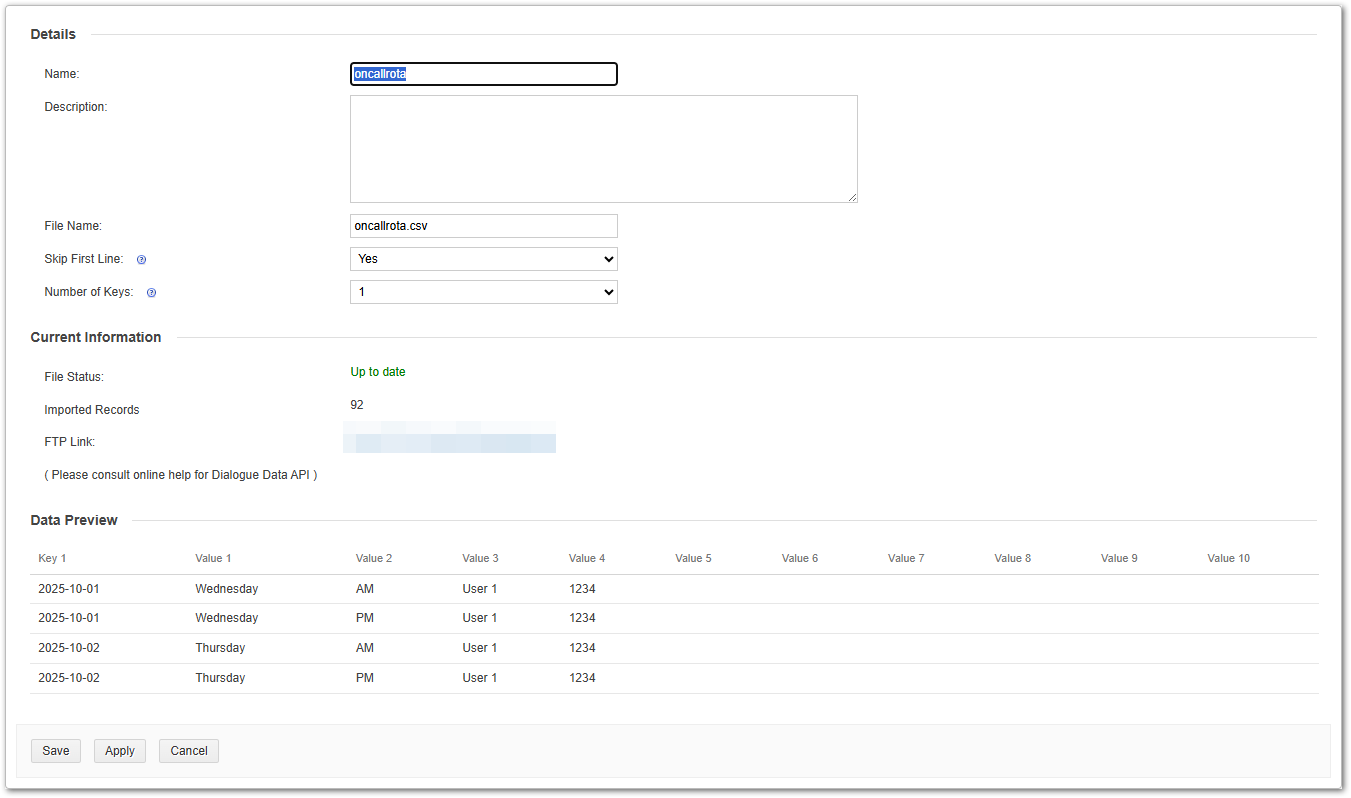
You’ll see a Data Preview. This preview shows how the system will interpret your data, giving you a chance to confirm that everything is correctly formatted before proceeding.
Your Dialogue
To automate the on-call routing, we’ll configure a series of blocks in your Dialogue:
-
Logic Block – Set Date and Hour
This block captures the current date and hour of the incoming call. It’s essential for matching against your rota data. -
Query Block – Look Up On-Call Details
This block queries your CSV data source to find the correct on-call contact based on the current date and time. -
Logic Block – Check AM or PM
This block determines whether the call is happening in the morning or afternoon, helping to select the right contact for that time slot. -
Transfer Block – Route the Call
Finally, this block transfers the call to the correct on-call number retrieved from your data source.
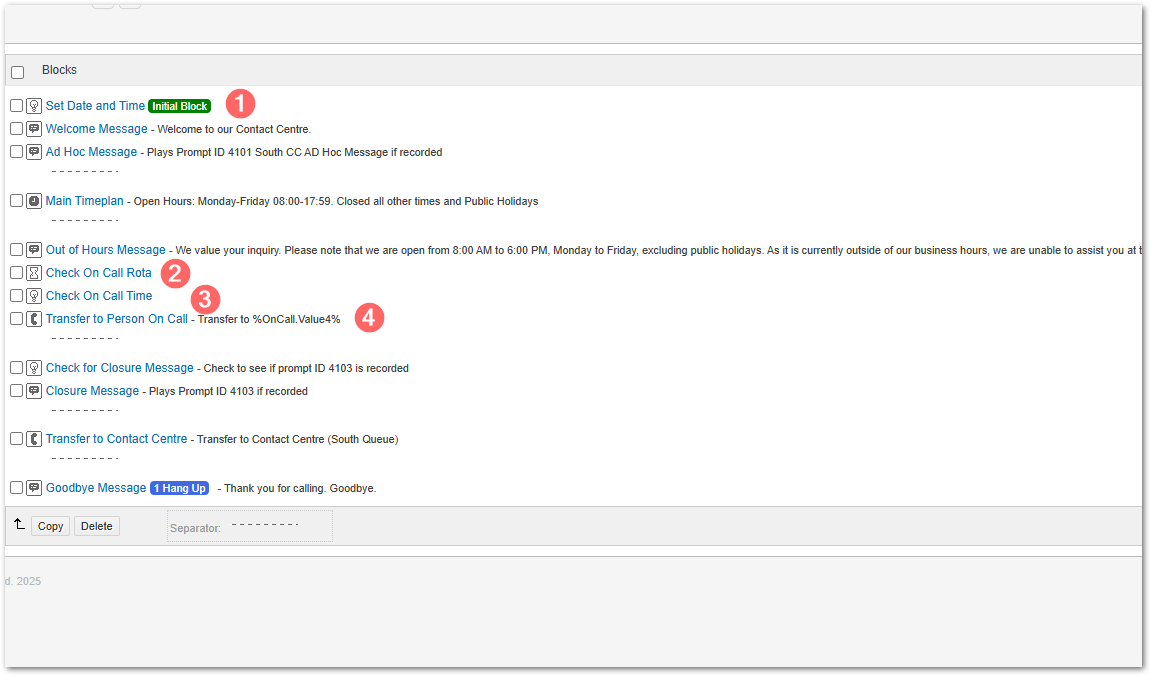
Example Dialogue
Below is an example of how I’ve structured my Dialogue. You’ll need to adjust yours to follow a similar pattern based on your system and requirements.
-
Set Date and Time (Logic Block)
This is the first block in the Dialogue and is set as the Initial Block under settings. It runs as soon as a call comes in and sets the necessary variables for the rest of the flow. -
Query Block – “Check On Call Rota”
This block queries the data source to find a match based on the current date and time. -
Logic Block – “Check On Call Time”
This block determines whether it’s AM or PM, helping to identify the correct person on call (especially useful for changeovers). -
Transfer Block – “Transfer to Person On Call”
This final block routes the call to the appropriate on-call contact based on the information retrieved.
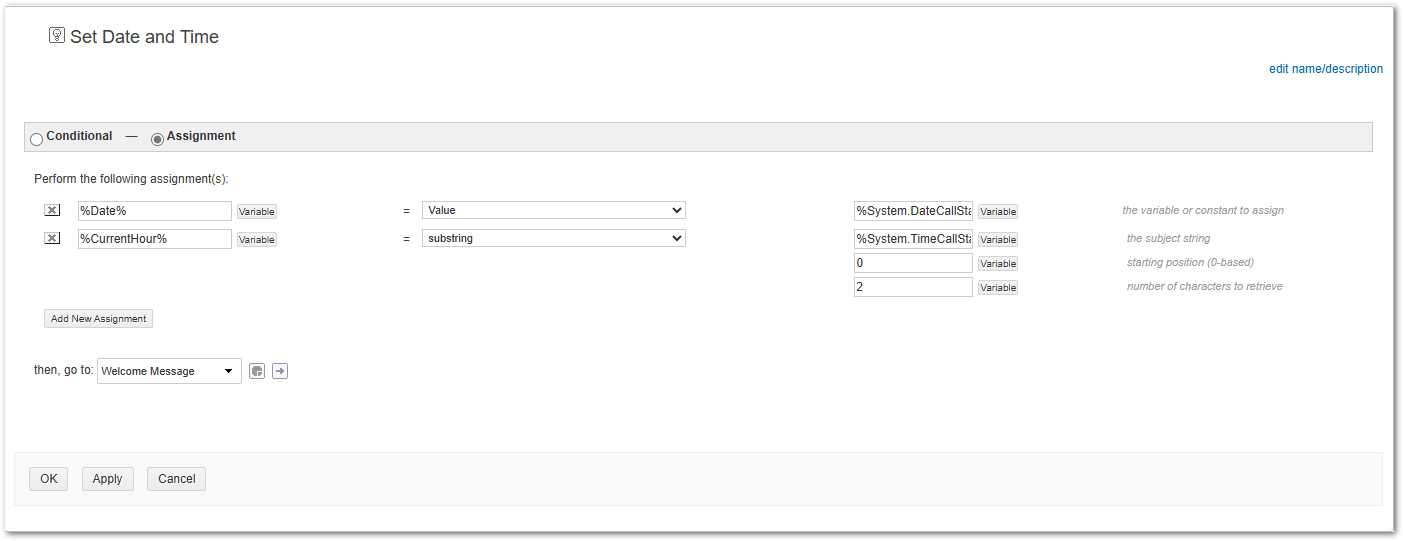
Logic Block – Set Date and Time
This is the first block in the Dialogue and should be set as the Initial Block under settings. Its purpose is to assign values to variables that will be used throughout the flow.
Step-by-Step Setup:
-
Change the Block Type to “Assignment”
This allows you to assign values to variables you’re creating. -
Create Variables
On the left-hand side, add the variables using double percentage signs (%%). For example:-
%Date%– to store the current date -
%CurrentHour%– to store the current hour
-
-
Assign the Current Date
-
Click the Variable button.
-
Select
%System%, then choose%System.DateCallStarted%.
-
-
Assign the Current Hour
-
Add a new assignment for
%CurrentHour%. -
From the dropdown, choose Substring.
-
Click Variable, select
%System%, then choose%System.TimeCallStarted%. -
Set the starting position to
0and number of characters to2.
This extracts the first two digits (the hour) from the time string.
-
-
Set the “Then, Go To” Action
Direct the flow to your required starting block. In my example, this is the Welcome Message block.
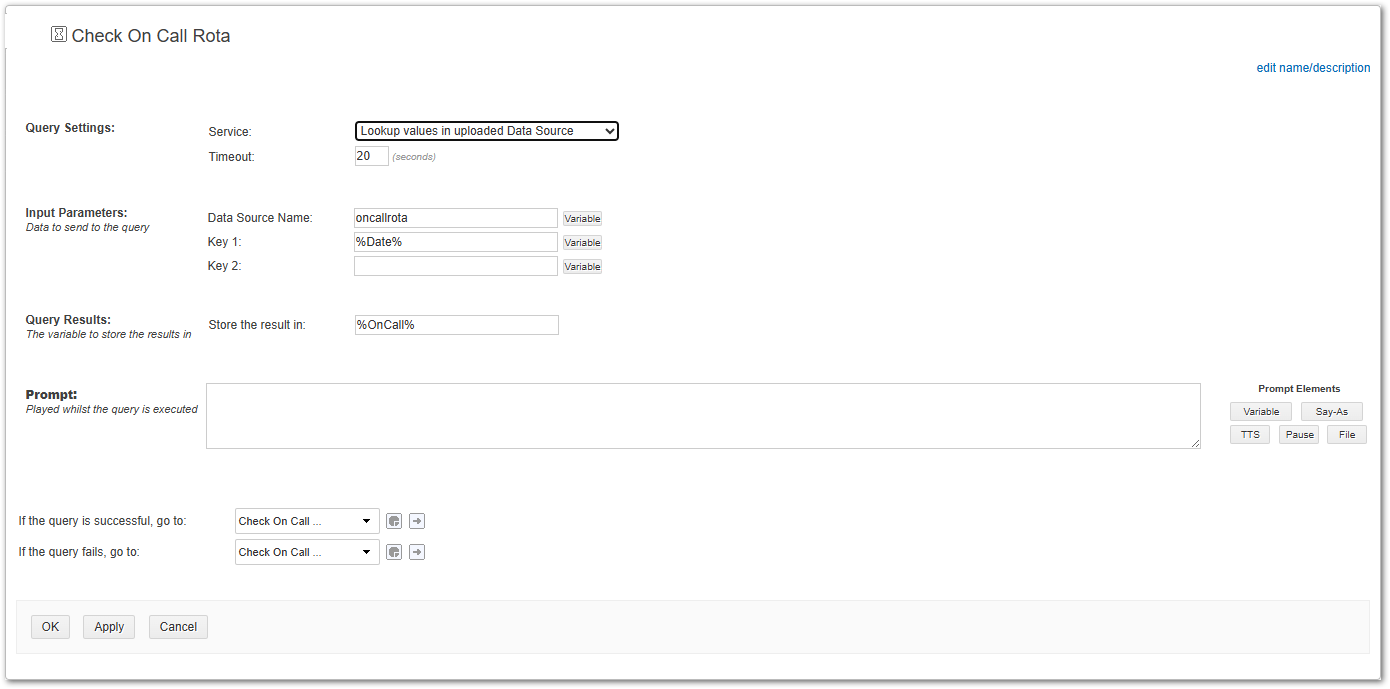
Query Block - Check On Call Rota
The next block to create is your Query Block, which will look up the on-call contact based on the current date.
Configuration Steps:
-
Service Type:
Select “Lookup values in uploaded Data Source.” -
Data Source Name:
Enter the name of your data source exactly as it appears under the Data tab.
(In my example, I’ve named itoncallrota.) -
Key 1:
Add your Date variable:%Date%
This will be used to match the current date against the entries in your data source. -
Store Result In:
Choose a variable to store the matched data.
(I’ve used%OnCall%in my example.) -
Routing Logic:
-
If a match is found: Route to your next logic block.
(In my case, this is a block calledCheck On Call Time.) -
If no match is found: You may want to create a fallback route.
(I’ve routed mine to the same block for simplicity, but you can create a dedicated fallback if needed.)
-
-
Prompt:
No prompt is needed for this block, as it’s purely for querying data.
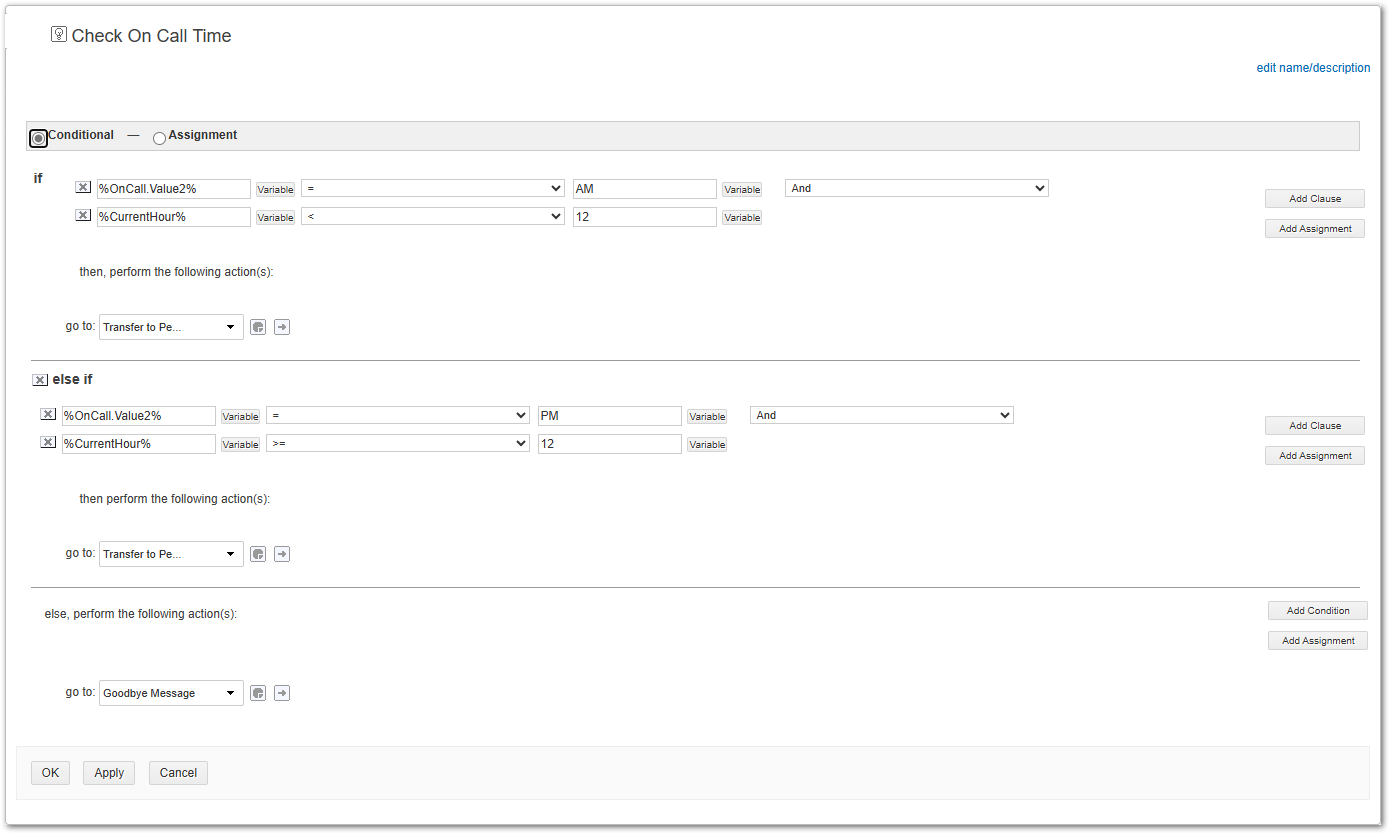
Logic Block - Check On Call Time
To determine whether to call the person on call for AM or PM, you’ll need to create a Conditional Logic Block. Here’s how to set it up:
1. Enable Conditional Logic
Make sure the block is set to Conditional Logic so you can define multiple conditions.
2. Set the AM Condition
-
Click Variable, select
%OnCall%, then choose%OnCall.Value2%(this corresponds to the AM/PM column in your data). -
Set the condition:
IF%OnCall.Value2%= AM -
Add a clause - This must be AND:
-
Click Variable, select
%CurrentHour% -
Set the condition:
%CurrentHour%< 12
(This checks if the current time is before midday using a 24-hour clock.)
-
3. Set the PM Condition
-
Add another condition:
IF%OnCall.Value2%= PM -
Add a clause:
-
Click Variable, select
%CurrentHour% -
Set the condition:
%CurrentHour%>= 12
(This checks if the current time is 12 or later.)
-
4. Define Outcomes
-
For both AM and PM conditions, set the “Then, go to” action to your Transfer to Person On Call block.
-
If no conditions are met, set the fallback to a Goodbye block — or consider creating a more detailed fallback route depending on your use case.
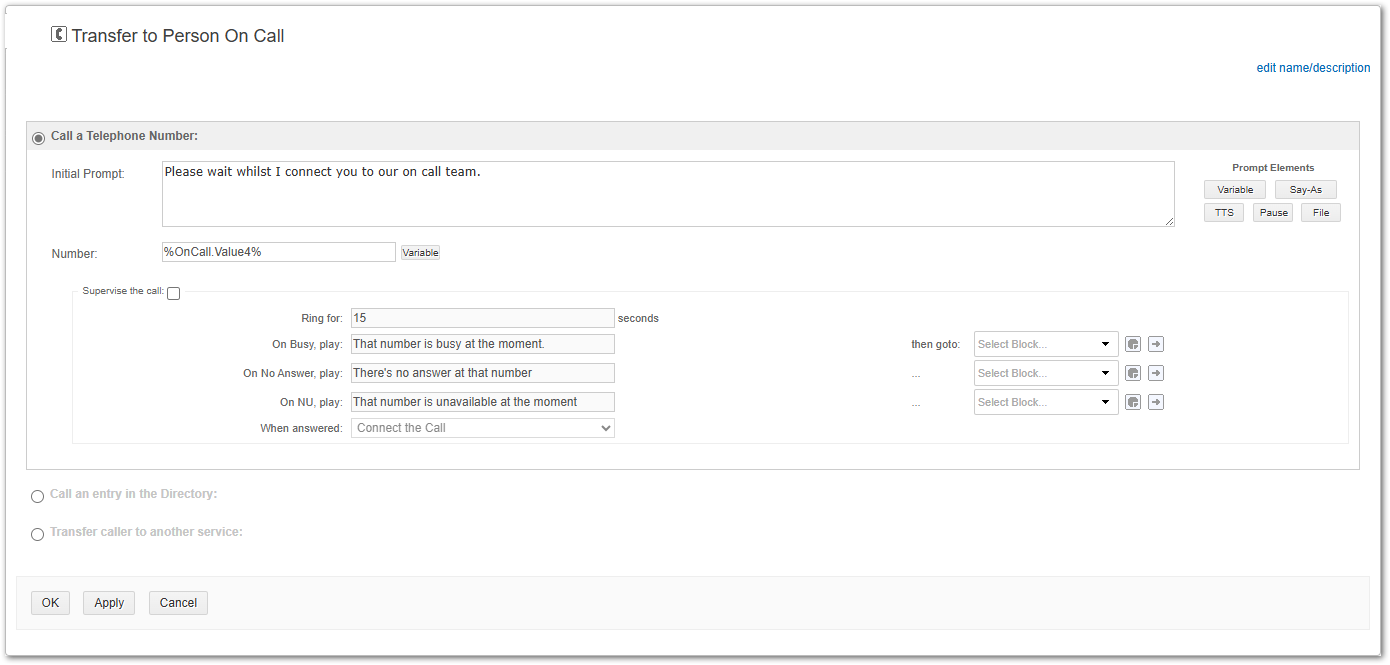
Transfer Block - Transfer to Person On Call
In your Transfer Block, you’ll want to do two key things:
-
Add an Initial Prompt
This is a short message to let the caller know they’re being transferred. For example:
“Please hold while I transfer you to the person currently on call.” -
Set the Transfer Number Dynamically
In the Number field, you’ll need to select the correct value from your CSV data.
In my example, the phone number is stored in column 5 of the CSV file, which corresponds to Value 4 in the data object.To configure this:
-
Click Variable
-
Select %OnCall%
-
Then choose %OnCall.Value4%
-
This setup ensures the system automatically transfers the call to the correct person based on the current date and AM/PM time, using the matched data from your oncallrota.csv file.
Wrapping Up
And that’s it — your Automated On-Call Rota using Dialogue Data and just a few blocks.
A few key points to keep in mind:
-
Data accuracy is critical. If your CSV file contains incorrect or misformatted data, the process will fail. Be especially cautious with dates and phone numbers, as Excel has a habit of reformatting these automatically.
-
Excel is useful, especially for creating the file initially, but always double-check the formatting before saving and uploading.
-
Plan for a fallback route. If the query fails or no match is found, what should happen next? Consider adding a default transfer or a message to inform the caller.
-
Test your Dialogue thoroughly. Make sure each block loads correctly and flows as expected. This ensures your solution is reliable and ready for real-world use.
If you have any questions or need help tailoring this to your setup, feel free to reach out.
Thanks,
Jonathan Redsell
Credit also goes to @JonathanGunner for helping me map this out.